ponedeljek, 15. avgust 2022

STEAMPUNK CORONA FIGHTER Mk.19 - 2

 Delavnica 2.del - Workshop part 2

Kot vedno sem se najprej lotil detajliranja v sprednjem kolesnem prostoru- pravzaprav bi moral reči prostor za shranjevanje sprednje pristajalne noge. Vse stare dele sem odstranil:

As always, I started with the detailing of the front undercarriage bay or, more accurately, the bay for storing the front undercarriage leg. I removed all of the old parts:

 
Stene in dno sem naredil na novo:
I redid the walls and the bottom:


Sledila je izdelava notranje opreme v stilu steampunka kolikor je to mogoče. Čeprav bi si vso opremo lahko izmislil, ker je to "what if" maketa, mi je bilo lažje, da sem se zgledoval po resničnem letalu. Iz bakrene folije sem naredil ojačitvene "U" profile in podložke, stene pa sem prekril z gravirano aluminijasto folijo od nekih zdravil:

Then I tried to recreate the Steampunk internal design. This being a “what if” model, I could have come up with my own design, but I found it easier to draw from the actual aircraft. I used copper foil to make the reinforced “U” profiles and plates, and covered the walls with engraved aluminium foil from some pill packaging that I had set aside.


Za notranjo opremo sem uporabil 5 jedkanih delov od Eduarda, 2 plastična dela, ki sta mi ostala od druge makete, vse drugo pa sem naredil iz stirena, injekcijskih igel, Albion cevi ter bakrene in svinčene žice.
For the internal design, I used 5 Eduard etched parts and 2 plastic parts that I had left from another model, and made all the rest from styrene, injection needles, Albion tubes and copper and lead wire.


Naredil sem tudi vse hidravlične cilindre:

I also made all the hydraulic cylinders:


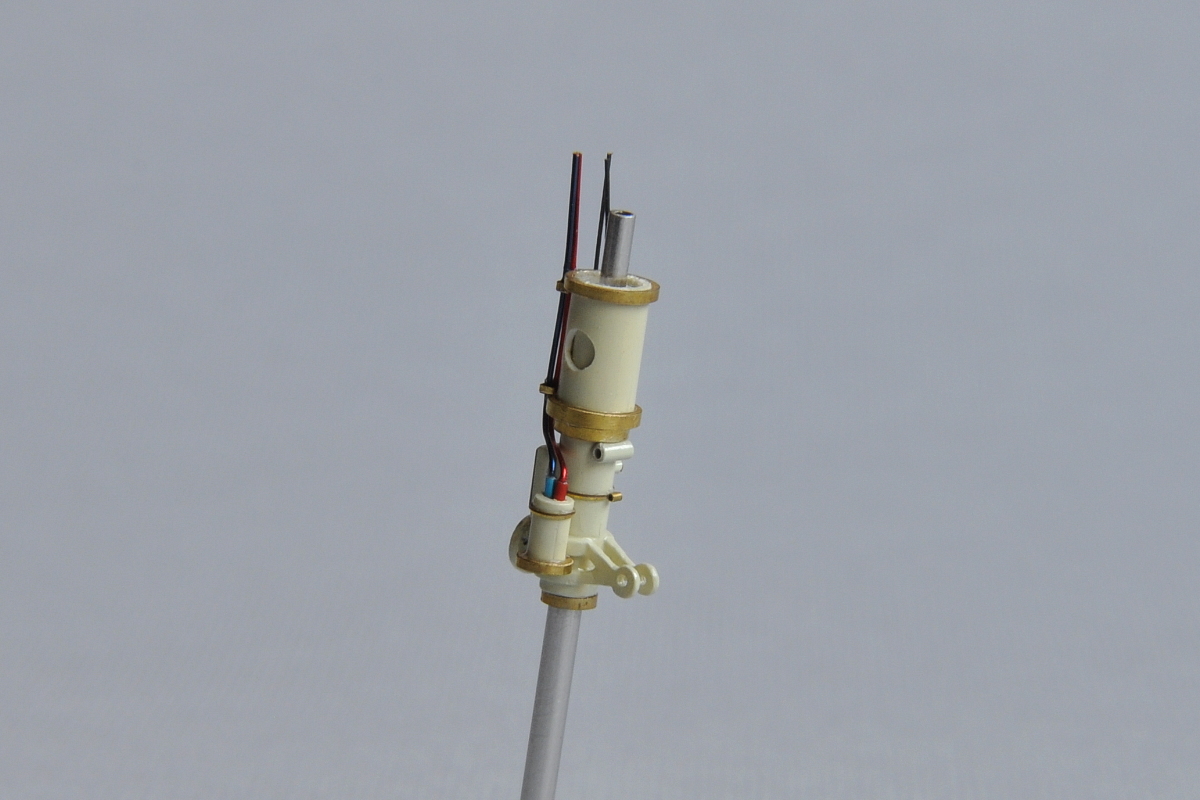
Kot že rečeno, bo to letalo za navpično vzlet in pristanek in torej ne potrebuje koles. Zaradi X-Wing-ov morajo biti pristajalne noge višje in teleskopske. Razen luči je stara sprednja pristajalna noga od F-14 neuporabna, zato sem vse moral narediti v samogradnji. Uporabil sem tudi 2 Eduardova jedkana dela za F-14.

As already mentioned, this aircraft will have vertical take-off and landing, and therefore doesn’t need any wheels. Because of the X-Wings, the undercarriage legs must be higher and telescopic. Except for the light, the old front undercarriage leg from the F-14 was useless, so I had to build everything from scratch. I also used 2 Eduard F-14 etched parts.

Takole izgleda skoraj gotova sprednja pristajalna noga:

This is how the nearly finished front undercarriage leg looks like now:


Za izdelavo loput za zapiranje kolesnega prostora sem uporabil Eduardove jedkane dele, notranjo stran loput pa sem naredil iz stirena.

To make the hatches closing the undercarriage bay, I used Eduard etched parts, and the inside of the hatches is made from styrene.


Sledila je izdelava kabine. Ker sem nabavil Eduardove jedkane dele za kabino sem jih skoraj vse tudi uporabil. Kolikor se je dalo sem se potrudil, da bi kabina bila v stilu steampunka. Najprej sem pobrusil in počistil obstoječi kabinski prostor.

Then I started working on the cockpit. As I had bought Eduard cockpit etched parts, I used most of them. I tried to recreate the Steampunk cockpit as much as possible. First I polished and cleaned the existing cockpit.


Zaradi brušenja nekatere površine niso bile več ravne zato sem naredil nove iz stirena 0,3 mm. Vse skupaj sem prekril z bakreno folijo, ki sem jo kasneje prelakiral z modrim prozornim lakom.

As certain surfaces were uneven because of the polishing, I made new ones using a 0.3 mm styrene. I covered the entire surface with copper foil, which I then coated with a transparent blue varnish.

Tudi podlagi za sprednji instrumentni plošči sem naredil iz stirena, za izdelavo nekaterih drugih detajlov pa sem uporabil Albionove proizvode.

The bases for the front instrument panels are also made from styrene. For other details, I used Albion products.


Eduardove instrumentne plošče sem prebarval z oranžnim prozornim lakom. Takole izgleda skoraj gotova kabina:

I painted the Eduard instrument panels with a transparent orange varnish. This is how the nearly finished cockpit looks like now:


sreda, 25. maj 2022

STEAMPUNK CORONA  FIGHTER Mk 19

 Delavnica 1.del - Workshop part 1

Pred več kot 40 leti sem naredil Monogramovi maketi F/A-18 in F-14A. Maketi sta bili ves čas v vitrini in dobro ohranjeni, ko pa sem se po dolgih letih ponovno lotil maketarstva, sta svoje mesto morali odstopiti novim maketam in se preseliti na polico.Takole sta maketi izgledali, ko sta še bili v vitrini: 

More than 40 years ago, I built the F/A-18 and F-14A Monogram models. The two models had been kept in a display case all this time and were well preserved, but when I started building models again after a long break, they had to give their place to newer models and were moved to a shelf.This is how the models looked like when they were still in the display case:


Prah in otroški prsti so maketi počasi toliko poškodovali, da sta bili zreli za smeti vendar sem se odločil, da iz obeh maket poizkusim narediti nekaj v stilu steampunka.
Maketa zagotovo ne bo pravi steampunk saj ne bo imela parnega pogona in zobatih koles. Bom pa na maketi poskusil uporabiti čim več materialov, ki so značilni za steampunk. Najprej sem moral ugotoviti ali iz obeh uničenih maket lahko naredim eno maketo kot sem si zamislil. Obe maketi sem popolnoma razstavil kolikor je bilo mogoče. Nato sem se lotil žaganja in poskusnega sestavljanja in ugotovil, da je zamisel uresničljiva.

Dust and children’s fingers slowly damaged the models to the extent that they had to be thrown away, but instead, I decided to try to build something along the lines of a steampunk.
Of course, the model would not be a real steampunk, as it would not have a steam engine or ratchet wheels. But I wanted to try to incorporate as many characteristic steampunk materials as possible. First, I had to see if I could use both destroyed models to build a single model as I had envisaged. I took both models apart as much as possible. I started sawing and test assembling and realised my idea was doable.


Sledila je nabava vsega potrebnega. Nabavil sem jedkane dele in sicer F-14A interior, F-14A exterior, F/A-18C interior, F/A-18C exterior, uporabil pa bom tudi nekatere jedkane dele, ki so mi ostali od prejšnjih maket. Prav tako sem nabavil bakrene in medeninaste cevi vseh dimenzij.

I went out to buy everything I needed. I bought the etched parts, namely the F-14A interior, the F-14A exterior, the F/A-18C interior and the F/A-18C exterior; I also intended to use a few etched parts I had left from previous models. I also bought copper and brass pipes of all dimensions.


Zamislil sem si štiri motorje za katere sem nabavil izpušne šobe od F-14, nekaj pa sem jih imel še od prejšnjih maket.

I decided to use four engines, for which I bought the F-14 exhaust nozzles, and I had a few left from previous models.


Zdaj poti nazaj ni bilo več. Z vseh delov sem odstranil barvo, pobrusil sem vse izbočene panelne linije in jih vgraviral na novo. Maketa bo imela X-winge za kar sem uporabil vertikalce, kot ojačitvene zakovice pa sem uporabil glavice bucik.

There was no turning back at that point. I removed the paint from all the parts, polished all the convex panel lines and engraved them anew. The model would have X-wings, for which I used verticals, and reinforcing rivets made from pinheads.


Spodnji vertikalec bo služil tudi kot pristajalna noga, zato ima izrez za hidravlično konstrukcijo.

The bottom vertical would serve as a landing leg, which is why it has a hole cut out for a hydraulic construction.

Tudi na trupu F-14 sem naredil ojačitvene zakovice:

I also made reinforcing rivets for the F-14 fuselage:


Za navpično pristajanje in vzletanje sem spodaj predvidel še štiri izpušne šobe.

I provided for four additional exhaust nozzles for vertical lending and take-off.


Za nosilec topa za zadnjega strelca sem med pozabljeno zalogo našel ravno pravšnjo plastiko.

I found the perfect type of plastics for the canon holder for the back shooter among the spare parts that I forgot I had.


S skalpelom sem poglobil vsa mesta za jedkane dele. Te bom prilepil šele ko bo maketa pobarvana. Jedkani deli bodo ostali medeninaste barve. Spredaj sem predvidel tudi kanarde za katere sem uporabil repna krila od neke stare makete, ki je nikoli nisem naredil.

I used a scalpel to deepen all the spots where the etched parts would fit. I will glue these on only once the model is painted. The etched parts will keep their brass colour. At the front, I provided for the canards, for which I used the tail wings from an old model that I never built.


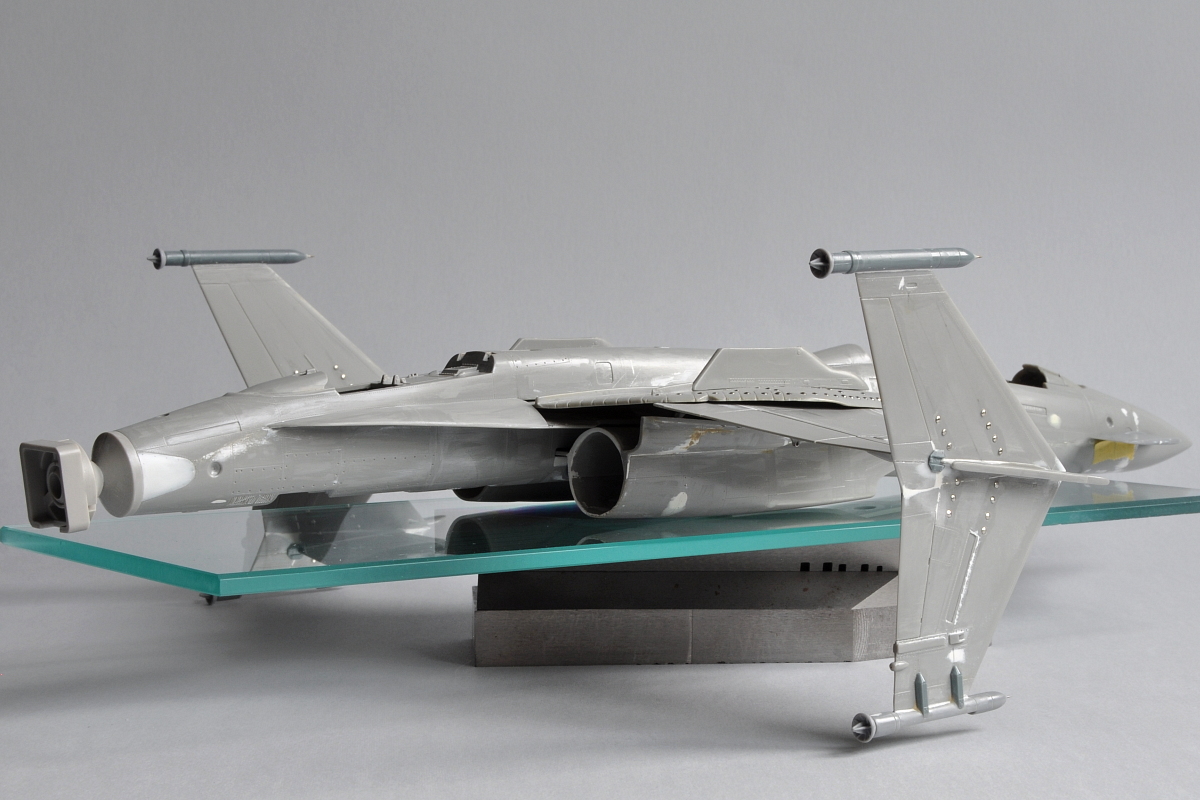
Takole izgleda Steampunk Corona Fighter do sedaj- oba trupa, krila in nosilci motorjev še niso zalepljeni.

This is what the Steampunk Corona Fighter looks like now – both fuselages, the wings and the engine carriers still need to be glued on.