
Mig-21M
Jugoslovansko vojno letalstvo, št. 805 - Yugoslav Air Force
Eduard 1:48

8.
VSTOPNIKI ZA ZRAK - AIR INTAKES
Letalo
ima na trupu osem vstopnikov za zrak in dva izstopnika - izpuha.
The aircraft has 8 intake holes and 2 exausts.
8.1 Vstopniki
na trupu - Intakes on the body
Vstopnike
D41, D42 in D51 navrtamo. Vstopnika D41 in D51 morata tudi biti malo prirezana
navznoter.
Intakes D41, D42 and D51 must be drilled. D41 and D51 must be a little cut into the body.


Vstopnika
C25 in C35 pa sta spredaj že malo izdolbena zato odprtino pobarvamo s črno
barvo in zamaskiramo z ovalno masko.
Intake C25 and C35 are already carved in the front. The hatch must be painted with a black color and masked with an oval tape.

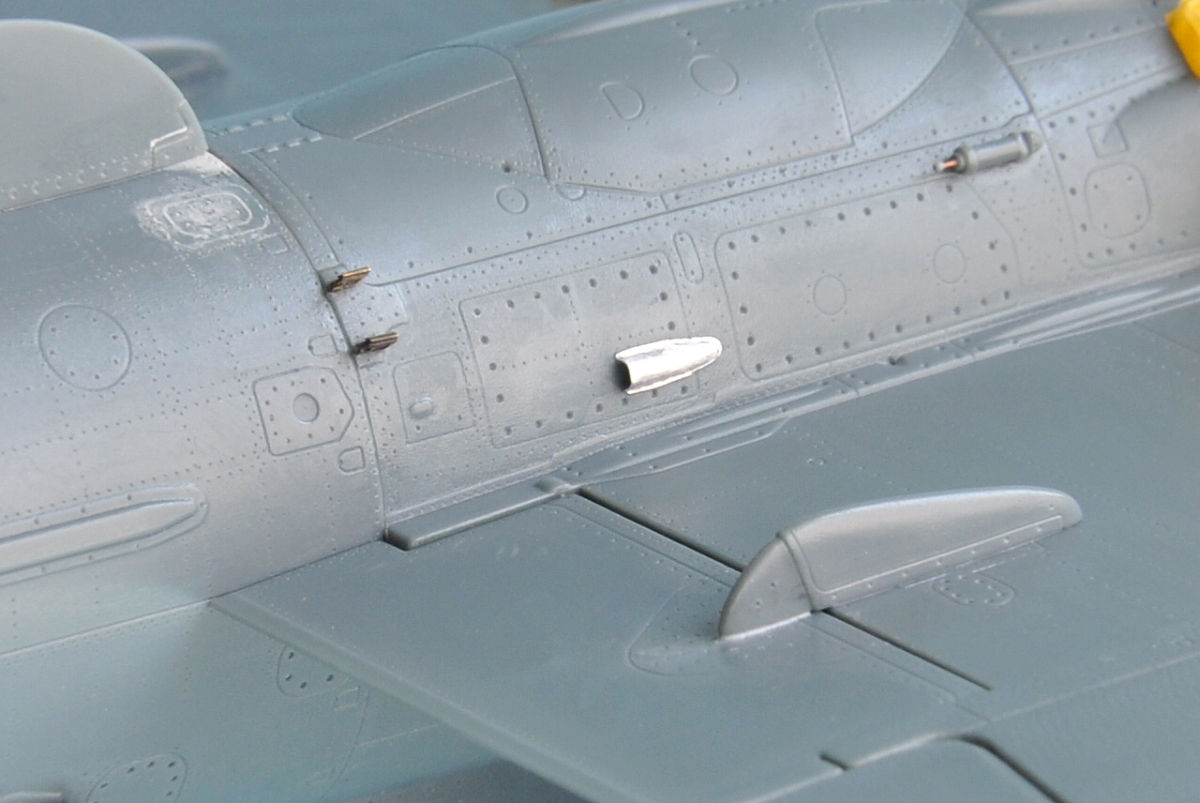
8.2 Vstopnika
na spodnjem smerniku (B10) - Intakes on the ventral fin (B10)
Vstopnika
na spodnjem smerniku sta samo nakazana kot vstopnika zato ju izdelamo iz
aluminijaste pločevine (Pragerfolie). Na smerniku B10 najprej odrežemo 3mm
začetka vstopnika in na preostanku pripravimo 0,5mm široko ležišče za
aluminijasti del vstopnika. Na orodju iz 3,5mm širokega aluminijastega traku
oblikujemo najprej pravokotno obliko, široko 1mm.
The intakes must be made of alluminium foil (Pragerfolie). On the ventral B10 we must first cut off 3mm of the end and on the rest prepair 0,5mm wide spot for the alluminum part of the intake. On the proper tools we form rectangular part out of the 3,5mm wide alluminum foil app. 1mm wide.


Sedaj
s primernim orodjem oblikujemo ovalno obliko. Potrebujemo mehkejšo podlago,
zadostuje že karton.
Now we can shape oval form with the right tools. All we need is a soft base plate (carton).


Stik
aluminijastega začetka vstopnika s plastičnim nadaljevanjem prekrijemo s kitom.
The joint of the alluminum intake with the plastic part can be carved with a putty.


8.3 Izstopnika
(izpuha) - Exhausts
Na
spodnjem delu trupa tik pod krilom sta tudi dva izstopnika C23. Izdelamo ju iz
aluminijaste pločevine, vendar tokrat ne uporabimo Pragerfolije ampak
aluminijasto pločevino, ki jo najdemo kot notranji pokrov v pločevinkah raznih
prehrambenih proizvodov. Ta pločevina je mehkejša in jo je lažje oblikovati
okoli modela po vseh krivinah.
On the lower part right beneath the wings there are 2 exausts C23. They may be made of alluminum foil, wich can be found as an internal hatch of the coffee, cocoa or some other cans. This foil is softer and is easier to shape it around the model on all the curves.

Najprej
izdelamo model iz plastike. Pri velikosti modela moramo upoštevati, da bomo
pločevino oblikovali preko modela in nam izdelek lahko izpade prevelik.
First we make a model out of the plastic. At the size of the model we must consider, that the foil will be shaped over the model and the final product can turn out too big.


Pločevino
s primernim orodjem oblikujemo preko modela po vseh krivinah.
The foil can be shaped over the model on all the areas with proper tools.


Na
koncu še obrežemo in pobrusimo.
On the end we must cut it and grind it.


9. KOVINSKI DODATKI - METAL ACCESSORIES
Eduard
ima v svojem kompletu Mig-21 Exterior 86 različnih jedkanih delov. Vtej fazi
jih bomo uporabili 29.
Eduard has all kinds of PE parts in his kit. In this phase, we will use them 29.
9.1 Dodatki
- spodaj - Accessories - Lower
Začnemo
z dodatkom št.26, to je »ležišče« za trolistno IFF anteno na nosu letala. Del
št.26 lahko nalepimo kar na trup, vendar je bolje da pred tem plastiko
poglobimo, ker bo sicer del 26 preveč odstopal od površine.
We begin with accessories No 26, that is a spot for the IFF aerial on the nose of the plane. Part No 26 can be glued on the body but is reccommended, that we deepend the plastic before, otherwise the part No 26 will depart from the surface itself.


Naslednji
dodatek je okrogla ploščica št. 37 (antena radiokompasa). Ta dodatek potrebuje
poglobitev v plastiko.
Next accessories is a circle shaped plate No 37(radiocompass aerial) that needs to be deepend into the plastic.


Krilca
št. 42 potrebujejo poglobitev zareze v katero jih nalepimo s trenutnim lepilom.
Pripadajoče trakove št. 71 pa lepimo z dvokomponentnim lepilom.
Wings No 42 (gun blast deflector) needs to be deepend into the panel in witch they are glued with a contact glue. PartNo 71 can be glued with a 2 conponent glue.


Nosilec
pomožnega štartnega raketnega motorja pred montažo preuredimo (del št. 5). Med
obe polovici vsakega nosilca prilepimo aluminijasti trak, ki nam bo olajšal
leplenje nosilca na trup letala. Na trupu naredimo ustrezno globoko zarezo za
aluminijasti trak.
The holder of the boost rocket engines must be modified before assembly (part No 5). Between both halfs of each holder we need to glue an alluminum tape, wich saves us the gluing procces on the body. The body must be modified with a small panel line for an alluminum tape.


Front part of the boost engine needs to be glued on the D63 part. We can fill it with a wire with a ball on the end.


Okvir
dielektrične plošče št. 54 potrebuje poglobitev v plastiko. Oba nastavka za
pitot cevi pod krilom pa morata odstopati od površine.
The frame of dielectric board No54 needs to be deepend into the plastic. Both parts for the pitot tubes beneath the wings must depart from the surface.


9.2 Dodatki
- zgoraj - Accessories - upper
Na
zgornji strani krila so krila št. 3 in 4 za katera moramo poglobiti žleb v
katerega jih zalepimo. Nalepimo tudi oba dela št. 85, ki pa jih je Eduard že
naredil previsoke, zato jih znižamo - pobrusimo vsaj na polovico višine.
On the top side of the wing there are another wings No 3 and 4, that need to be put together into the panel. We need to glue both parts No 85, wich Eduard made'em to high, so we need to make them lower (Grind them on at least half of their height).


Preden
zalepimo rep letala (H2, H6) na trup, moramo namestiti ploščico št. 81 na
zgornji strani izpuha.
Before we glue the tail of the aircraft (H2,H6) on the body, we must place the plate No 81 on the top side of the exaust.


Na
sami shrambi zaviralnega padala sta dva kovinska dela (št. 57, 63) namenjena
odpiranju in zapiranju.
On the breaking parachute storage there a 2 metal parts (57,63) wich are used for opening and closing the room.


Dodatek
št. 26 za ležišče trolistne IFF antene na vrhu repa je preširok za debelino
zgornjega roba. Dodatek malo zožimo z brušenjem, zgornji rob repa pa razširimo
s kitom.
Part No 26 for the IFF aerial on the top of the wing is too wide for the width of the top edge. To solve this problem we must narrow it down with grinding, top edge needs to ve widen.

Odvajalci
statične elektrike so pri Eduardu ploščati, zato jih nadomestimo z žico.
Static discharge wicks are square shaped in Eduards kit so we replace them with a wire.


9.3 Sprednja
pitot cev - Pitot - static boom
Namesto
Eduardovega plastičnega dela D4 uporabimo kovinsko cev proizvajalca MASTER. Od
dela D4 se uporabi samo ležišče cevi v katero je potrebno zvrtati luknje
0,8mm.Vrtati je potrebno pod pravilnim kotom, zato si je dobro izrisati celoten
del D4.
Instead of Eduards part D4 we use a metal pipe of the MASTER company. Of the part D4 we only use the pipe spot in wich we need to drill a 0,8mm hole. We need to drill under the right angle, so is reccommended to draw the part D4 for easier drilling.


Cev
ukrivimo kakor je prikazano v priloženem načrtu. Če jo lepimo v ležišče s
trenutnim lepilom kakor je svetovano od proizvajalca, moramo biti pazljivi.
Koleno cevi mora biti pravokotno na tla in lahko se zgodi, da nam bo vrh cevi
štrlel na eno ali drugo stran (pri trenutnem lepilu imamo pač le en poizkus).
We bend the pipe as is shown in instrucitons. If we're planning to glue it with a contact glue we must be really carefull. The knee of the pipe must be rectangular on the floor and it may happen that the top of the pipe will be looking on the both sides of the part. We only have one shot with using the contact glue.


9.4 Pitot
cev pred kabino (D68) - Dynamic pressure probe
Pitot
cev za merjenje dinamičnega pritiska naredimo v samogradnji. Cev iz plastike
odrežemo, ležišče cevi pa pokitamo in pobrusimo tako, da bo ta del res okrogel.
Spredaj izvrtamo še luknjo kamor bomo nasadili pitot cev.
The probe for the dynamic pressure measuring can be scratchbuilt. We cut the pipe out of the plastic, the spot of the pipe must be filled with a putty and grinded so the part is really round. In front we drill another hole where we gonna place the pipe.

Samo
cev izdelamo iz injekcijske igle 0,4mm, razširitev cevi na koncu pa izdelamo iz
igle 0,7mm.
The pipe itself can be made of hypodermic needle 0,4mm, the extension of the pipe on the end with 0,7mm.


10. TOP GSh-23 - CANNON GSh-23
Uporabimo
vse kovinske dodatke iz kompleta Mig-21MF exterior.
We use all metal accessories form the Mig-21MF exterrior kit.

Del
F31 izdolbemo in vanj prilepimo ustja topovskih cevi (injekcijska igla 0,8mm).
Na kovinski del št.83 prilepimo še aluminijasto ploščico z luknjama
(samogradnja).
Part F31 must be carved and we need to glue them into the spot of the cannon pipes (Hypodermic needle 0,8mm). On the metal part No.83 we glue an alluminum foil with holes (Scratchbuild).


Because we are making an M verison we need to reshape the back half of the cannon gondola, because the Eduards version is made for the latest MF and BIS version.

Najbolj
opazna razlika je v velikosti izpustnikov za prazne tulce nabojev. Zadnja
varianta topovske gondole je imela opazno manjše izpustnike. Plastični deli za
izpustnike št.F18 so ravno prav majhni za zadnjo varianto gondole. Jedkani deli
št.28 pa so ravno prav veliki za vse predhodne verzije, zato uporabimo le-te. S
sprednje strani izpustnika je dobro vidna pregrada. Naredimo jo iz pločevine
jedkanih delov, prav tako pregrado na zadnji strani.
The most noticable difference is in the size of the spent case ejection ports. The lastest version has a small hatches. Plastic hatches part No.F18 are to small for our version. The PE parts No.28 are the right size, so we use this one. From the front side of the hatch we can see a barrier. We make this barrier out of the leftovers of PE parts. We do the same on the back side.


11. VRATA ZADNJEGA KOLESNEGA PROSTORA - MAINWHEEL INBOARD DOOR
Na
vrata najprej naredimo manjkajoče detajle, nekatere vgraviramo in odtisnemo
kovice. Vsi Mig-i 21 so imeli na desnih vratih servisne ploščice z napisi, ki
jih naredimo v samogradnji. Najprej z matt barvo v tankem sloju pobarvamo
aluminijasto pločevino, nato pa z gravirno iglo izrišemo kar je potrebno.
The doors must be modified with rivetts and al other details first. All Migs-21 had writings on the right side of the service board so we must made them aswell. First we paint the whole alluminum board with a matt color and then we plot everything that needs to be engraved with an engraving needle.


Ni komentarjev:
Objavite komentar